前回は Flask アプリケーションのテストとコードカバレッジの測定を行いました。今回は Flask アプリケーションの CPU とメモリ使用量のプロファイリングを試してみます。内容としてはライブラリやツールの紹介となっています。
前回と同様に Flask の Tutorial で紹介されている Flaskr と呼ばれる blog application を用いています。
- CPU Profiling
- Memory Profiling
- Flask-DebugToolbar
CPU Profiling
アプリケーションの各処理の速度を測定することで, ボトルネックを特定する手がかりを得ることができます。今回は werkzeug.middleware.profiler を用いて計測, 同時に生成された cProfile を SnakeViz で可視化する方法と, pyinstrument で計測/可視化方法の2つを紹介します。
他にも, ここでは紹介しませんが APM (Application Performance Monitoring) tool としては Retrace (有償) などがあります。
werkzeug.middleware.profiler.ProfilerMiddleware
flaskr/__init__.py 内で werkzeug.middleware.profiler.ProfilerMiddleware を import します。ProfilerMiddleware の設定は以下で profile_dir に指定した場所に cProfile が生成されます。
    app.config['PROFILE'] = True
    app.wsgi_app = ProfilerMiddleware(app.wsgi_app,
                                      profile_dir=".",
                                      sort_by=['tottime'],
                                      restrictions=[10])
flaskr/__init__.py の全体のコードは以下です。
import os
import sys

from flask import Flask
from werkzeug.middleware.profiler import ProfilerMiddleware


def create_app(test_config=None):
    """Create and configure an instance of the Flask application."""
    app = Flask(__name__, instance_relative_config=True)
    app.config.from_mapping(
        # a default secret that should be overridden by instance config
        SECRET_KEY="dev",
        # store the database in the instance folder
        DATABASE=os.path.join(app.instance_path, "flaskr.mysql"),
    )

    if test_config is None:
        # load the instance config, if it exists, when not testing
        app.config.from_pyfile("config.py", silent=True)
    else:
        # load the test config if passed in
        app.config.update(test_config)

    # ensure the instance folder exists
    try:
        os.makedirs(app.instance_path)
    except OSError:
        pass

    @app.route("/hello")
    def hello():
        return "Hello, World!"

    # register the database commands
    from flaskr import db

    db.init_app(app)

    # apply the blueprints to the app
    from flaskr import auth, blog

    app.register_blueprint(auth.bp)
    app.register_blueprint(blog.bp)

    # make url_for('index') == url_for('blog.index')
    # in another app, you might define a separate main index here with
    # app.route, while giving the blog blueprint a url_prefix, but for
    # the tutorial the blog will be the main index
    app.add_url_rule("/", endpoint="index")

    app.config['PROFILE'] = True
    app.wsgi_app = ProfilerMiddleware(app.wsgi_app,
                                      profile_dir=".",
                                      sort_by=['tottime'],
                                      restrictions=[10])

    return app
flask run コマンドを実行し Web ブラウザから `/` にアクセスすると, 標準出力に以下のメトリクスが出力されます。設定通り, tottime の降順に上位10件が表示されています。
PATH: '/'
         34641 function calls (32306 primitive calls) in 0.073 seconds

   Ordered by: internal time
   List reduced from 832 to 10 due to restriction <10>

   ncalls  tottime  percall  cumtime  percall filename:lineno(function)
        1    0.017    0.017    0.017    0.017 {method 'do_handshake' of '_ssl._SSLSocket' objects}
       50    0.011    0.000    0.011    0.000 {method 'read' of '_ssl._SSLSocket' objects}
        1    0.004    0.004    0.004    0.004 {built-in method _socket.getaddrinfo}
      317    0.003    0.000    0.003    0.000 {built-in method __new__ of type object at 0x100a0e568}
        2    0.002    0.001    0.002    0.001 {method 'read' of '_io.BufferedReader' objects}
        1    0.002    0.002    0.002    0.002 {method 'recv' of '_socket.socket' objects}
     1902    0.002    0.000    0.003    0.000 /Users/t2sy/.pyenv/versions/anaconda3-5.3.0/envs/py37/lib/python3.7/site-packages/jinja2/nodes.py:164(iter_child_nodes)
      345    0.001    0.000    0.003    0.000 /Users/t2sy/.pyenv/versions/anaconda3-5.3.0/envs/py37/lib/python3.7/site-packages/jinja2/lexer.py:599(tokeniter)
        2    0.001    0.001    0.001    0.001 {built-in method builtins.compile}
     1040    0.001    0.000    0.001    0.000 {method 'match' of 're.Pattern' objects}
各カラムの意味は以下です。
- ncalls: fucntion call 回数
- tottime: sub-function call を除く fucntion call に消費された時間
- percall: tottime / ncalls
- cumtime: sub-function call を含む fucntion call に消費された時間
- percall: cumtime / ncalls
profile_dir に指定した場所に cProfile ファイル (e.g. GET.root.73ms.1567863700.prof) が生成されます。
SnakeViz
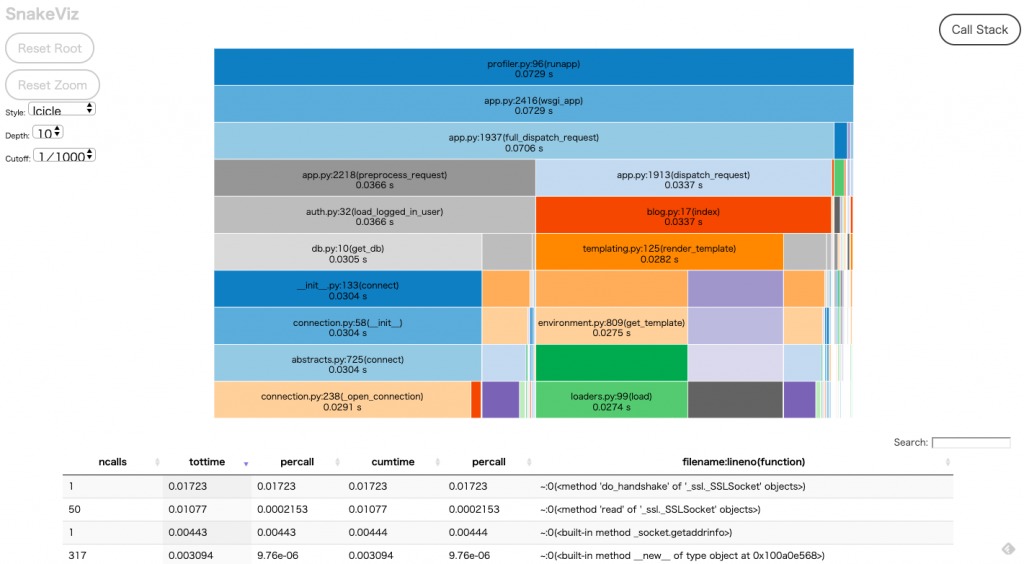
SnakeViz で生成された cProfile を可視化してみます。snakeviz コマンドを実行します。
$ snakeviz GET.root.73ms.1567863700.prof
snakeviz web server started on 127.0.0.1:8080; enter Ctrl-C to exit
上記コマンドを実行後, ブラウザのウィンドウに新しいタブが開かれ, 実行に時間がかかっているところを視覚的に確認できます。

pyinstrument
pyinstrument は call stack profilor です。pyinstrument はProfilerMiddleware + SnakeViz と比較し, 手軽に計測結果を確認できる印象があります。

通常の Python Script では, 以下のように Profiler クラスのインスタンスを作り, start() で測定を開始, stop() で停止します。
from pyinstrument import Profiler

profiler = Profiler()
profiler.start()

# code you want to profile

profiler.stop()

print(profiler.output_text(unicode=True, color=True))
Flask アプリケーションではリクエストに対する処理を計測対象にする場合が多いため, デコレータを使ってリクエストの本処理開始前 (flask.Flask.before_request) に Profiler の計測を開始し, 本処理終了後 (flask.Flask.after_request) に停止するようにします。例えば, 以下のように flaskr/__init__.py を変更します。
import os
import sys

from flask import Flask
from pyinstrument import Profiler
from flask import g, make_response, request

def create_app(test_config=None):
    """Create and configure an instance of the Flask application."""
    app = Flask(__name__, instance_relative_config=True)
    app.config.from_mapping(
        # a default secret that should be overridden by instance config
        SECRET_KEY="dev",
        # store the database in the instance folder
        DATABASE=os.path.join(app.instance_path, "flaskr.mysql"),
    )

    if test_config is None:
        # load the instance config, if it exists, when not testing
        app.config.from_pyfile("config.py", silent=True)
    else:
        # load the test config if passed in
        app.config.update(test_config)

    # ensure the instance folder exists
    try:
        os.makedirs(app.instance_path)
    except OSError:
        pass

    @app.route("/hello")
    def hello():
        return "Hello, World!"

    # register the database commands
    from flaskr import db

    db.init_app(app)

    # apply the blueprints to the app
    from flaskr import auth, blog

    app.register_blueprint(auth.bp)
    app.register_blueprint(blog.bp)

    # make url_for('index') == url_for('blog.index')
    # in another app, you might define a separate main index here with
    # app.route, while giving the blog blueprint a url_prefix, but for
    # the tutorial the blog will be the main index
    app.add_url_rule("/", endpoint="index")

    @app.before_request
    def before_request():
        if "profile" in request.args:
            g.profiler = Profiler()
            g.profiler.start()

    @app.after_request
    def after_request(response):
        if not hasattr(g, "profiler"):
            return response
        g.profiler.stop()
        output_html = g.profiler.output_html()
        return make_response(output_html)

    return app
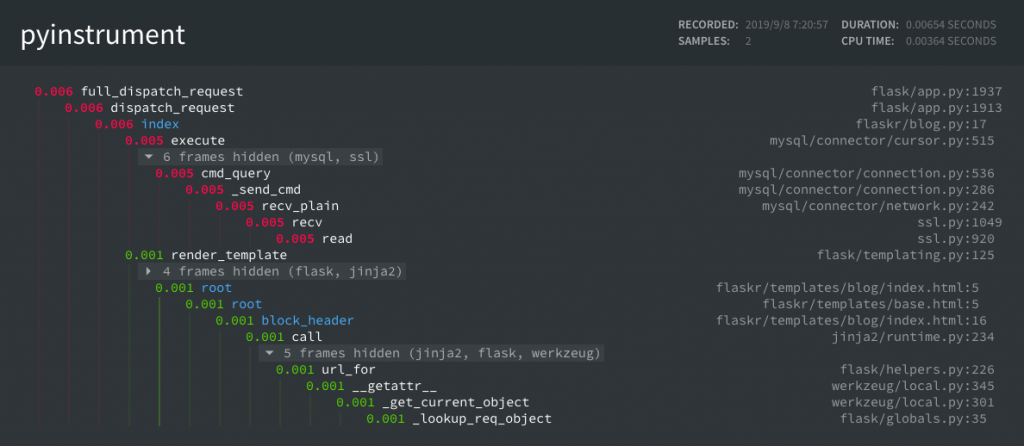
flask run コマンドを実行後, Web ブラウザで計測したいページの URL のクエリパラメータに `?profile` を追加してアクセスすることで以下のように計測結果が表示されます。

Memory Profiling
memory_profiler
Web アプリケーションを運用する上で速度だけでなくメモリ使用量を監視することも重要です。memory_profiler で Flask アプリケーションのメモリ使用量をプロファイリングしてみます。memory_profiler では細かいカスタマイズを必要としない場合, 計測対象の関数に profile デコレータを付けることで簡単に計測できます。
ここでは, flaskr/blog.py 内の RDB からブログの投稿を取得する関数のメモリ使用量を調べてみます。
@profile(precision=4)
def get_post(id, check_author=True):
    """Get a post and its author by id.

    Checks that the id exists and optionally that the current user is
    the author.

    :param id: id of post to get
    :param check_author: require the current user to be the author
    :return: the post with author information
    :raise 404: if a post with the given id doesn't exist
    :raise 403: if the current user isn't the author
    """
    cur = get_db().cursor(buffered=True)
    cur.execute(
        "SELECT p.id, title, body, created, author_id, username"
        " FROM post p JOIN user u ON p.author_id = u.id"
        " WHERE p.id = %s",
        (id,),)
    resp = cur.fetchone()

    if resp is None:
        abort(404, "Post id {0} doesn't exist.".format(id))

    keys = ['id', 'title', 'body', 'created', 'author_id', 'username']
    post = {}
    for k, v in zip(keys, resp):
        post[k] = v

    if check_author and post["author_id"] != g.user["id"]:
        abort(403)

    return post
ブログを更新するためのエンドポイント `/<int:id>/update` へのリクエストは update(id) に対応付けられており, この関数の内部で get_post() が呼ばれます。そのため, このエンドポイントに Web ブラウザからアクセスします。以下のように標準出力に関数の各行単位のメモリ使用量が出力されます。
Line #    Mem usage    Increment   Line Contents
================================================
    38  37.1836 MiB  37.1836 MiB   @profile(precision=4)
    39                             def get_post(id, check_author=True):
    40                                 """Get a post and its author by id.
    41
    42                                 Checks that the id exists and optionally that the current user is
    43                                 the author.
    44
    45                                 :param id: id of post to get
    46                                 :param check_author: require the current user to be the author
    47                                 :return: the post with author information
    48                                 :raise 404: if a post with the given id doesn't exist
    49                                 :raise 403: if the current user isn't the author
    50                                 """
    51  37.1836 MiB   0.0000 MiB       cur = get_db().cursor(buffered=True)
    52  37.1836 MiB   0.0000 MiB       cur.execute(
    53  37.1836 MiB   0.0000 MiB           "SELECT p.id, title, body, created, author_id, username"
    54                                     " FROM post p JOIN user u ON p.author_id = u.id"
    55                                     " WHERE p.id = %s",
    56  37.1875 MiB   0.0039 MiB           (id,),)
    57  37.1875 MiB   0.0000 MiB       resp = cur.fetchone()
    58
    59
    60  37.1875 MiB   0.0000 MiB       if resp is None:
    61                                     abort(404, "Post id {0} doesn't exist.".format(id))
    62
    63  37.1875 MiB   0.0000 MiB       keys = ['id', 'title', 'body', 'created', 'author_id', 'username']
    64  37.1875 MiB   0.0000 MiB       post = {}
    65  37.1875 MiB   0.0000 MiB       for k, v in zip(keys, resp):
    66  37.1875 MiB   0.0000 MiB           post[k] = v
    67
    68  37.1875 MiB   0.0000 MiB       if check_author and post["author_id"] != g.user["id"]:
    69                                     abort(403)
    70
    71  37.1875 MiB   0.0000 MiB       return post, []


Filename: /Users/t2sy/python/flask-testing-profiling/flask/examples/tutorial/flaskr/blog.py

Line #    Mem usage    Increment   Line Contents
================================================
   103  37.1836 MiB  37.1836 MiB   @bp.route("//update", methods=("GET", "POST"))
   104                             @login_required
   105                             @profile(precision=4)
   106                             def update(id):
   107                                 """Update a post if the current user is the author."""
   108  37.2031 MiB   0.0195 MiB       post = get_post(id)
   109
   110  37.2031 MiB   0.0000 MiB       if request.method == "POST":
   111                                     title = request.form["title"]
   112                                     body = request.form["body"]
   113                                     error = None
   114
   115                                     if not title:
   116                                         error = "Title is required."
   117
   118                                     if error is not None:
   119                                         flash(error)
   120                                     else:
   121                                         cnx = get_db()
   122                                         cur = cnx.cursor(buffered=True)
   123                                         cur.execute(
   124                                             "UPDATE post SET title = %s, body = %s WHERE id = %s", (title, body, id)
   125                                         )
   126                                         cnx.commit()
   127                                         return redirect(url_for("blog.index"))
   128
   129  37.5508 MiB   0.3477 MiB       return render_template("blog/update.html", post=post)
ここで, get_post() 内で長さ 1,000,000 のサイズの list を確保するコード (nums = [x**2 for x in range(1000000)]) を追加して再度 `/<int:id>/update` にアクセスしてみます。
Line #    Mem usage    Increment   Line Contents
================================================
    38  37.2266 MiB  37.2266 MiB   @profile(precision=4)
    39                             def get_post(id, check_author=True):
    40                                 """Get a post and its author by id.
    41
    42                                 Checks that the id exists and optionally that the current user is
    43                                 the author.
    44
    45                                 :param id: id of post to get
    46                                 :param check_author: require the current user to be the author
    47                                 :return: the post with author information
    48                                 :raise 404: if a post with the given id doesn't exist
    49                                 :raise 403: if the current user isn't the author
    50                                 """
    51  37.2266 MiB   0.0000 MiB       cur = get_db().cursor(buffered=True)
    52  37.2266 MiB   0.0000 MiB       cur.execute(
    53  37.2266 MiB   0.0000 MiB           "SELECT p.id, title, body, created, author_id, username"
    54                                     " FROM post p JOIN user u ON p.author_id = u.id"
    55                                     " WHERE p.id = %s",
    56  37.2305 MiB   0.0039 MiB           (id,),)
    57  37.2305 MiB   0.0000 MiB       resp = cur.fetchone()
    58
    59  68.3359 MiB   0.0742 MiB       nums = [x**2 for x in range(1000000)]
    60
    61  68.0859 MiB   0.0000 MiB       if resp is None:
    62                                     abort(404, "Post id {0} doesn't exist.".format(id))
    63
    64  68.0859 MiB   0.0000 MiB       keys = ['id', 'title', 'body', 'created', 'author_id', 'username']
    65  68.0859 MiB   0.0000 MiB       post = {}
    66  68.0859 MiB   0.0000 MiB       for k, v in zip(keys, resp):
    67  68.0859 MiB   0.0000 MiB           post[k] = v
    68
    69  68.0859 MiB   0.0000 MiB       if check_author and post["author_id"] != g.user["id"]:
    70                                     abort(403)
    71
    72  68.0859 MiB   0.0000 MiB       return post, nums


Filename: /Users/t2sy/python/flask-testing-profiling/flask/examples/tutorial/flaskr/blog.py

Line #    Mem usage    Increment   Line Contents
================================================
   103  37.2227 MiB  37.2227 MiB   @bp.route("//update", methods=("GET", "POST"))
   104                             @login_required
   105                             @profile(precision=4)
   106                             def update(id):
   107                                 """Update a post if the current user is the author."""
   108  68.1016 MiB  30.8789 MiB       post, nums = get_post(id)
   109
   110  68.1016 MiB   0.0000 MiB       if request.method == "POST":
   111                                     title = request.form["title"]
   112                                     body = request.form["body"]
   113                                     error = None
   114
   115                                     if not title:
   116                                         error = "Title is required."
   117
   118                                     if error is not None:
   119                                         flash(error)
   120                                     else:
   121                                         cnx = get_db()
   122                                         cur = cnx.cursor(buffered=True)
   123                                         cur.execute(
   124                                             "UPDATE post SET title = %s, body = %s WHERE id = %s", (title, body, id)
   125                                         )
   126                                         cnx.commit()
   127                                         return redirect(url_for("blog.index"))
   128
   129  68.4609 MiB   0.3594 MiB       return render_template("blog/update.html", post=post)
list を追加する前と比較し約 30 MiB, メモリ使用量が増加していることが確認できます。
Flask-DebugToolbar
Flask-DebugToolbar はプロファイリングに直接的には関係ありませんが, Flask アプリケーションの開発/デバッグに役立つ Toolbar 機能を提供します。
使い方は簡単で, 例えば tutorial の Flaskr の場合, flaskr/__init__.py に以下のように数行追加します。
import os
import sys

from flask import Flask
from flask_debugtoolbar import DebugToolbarExtension

def create_app(test_config=None):
    """Create and configure an instance of the Flask application."""
    app = Flask(__name__, instance_relative_config=True)

    # Setting flask app
    # ...

    toolbar = DebugToolbarExtension(app)
    return app
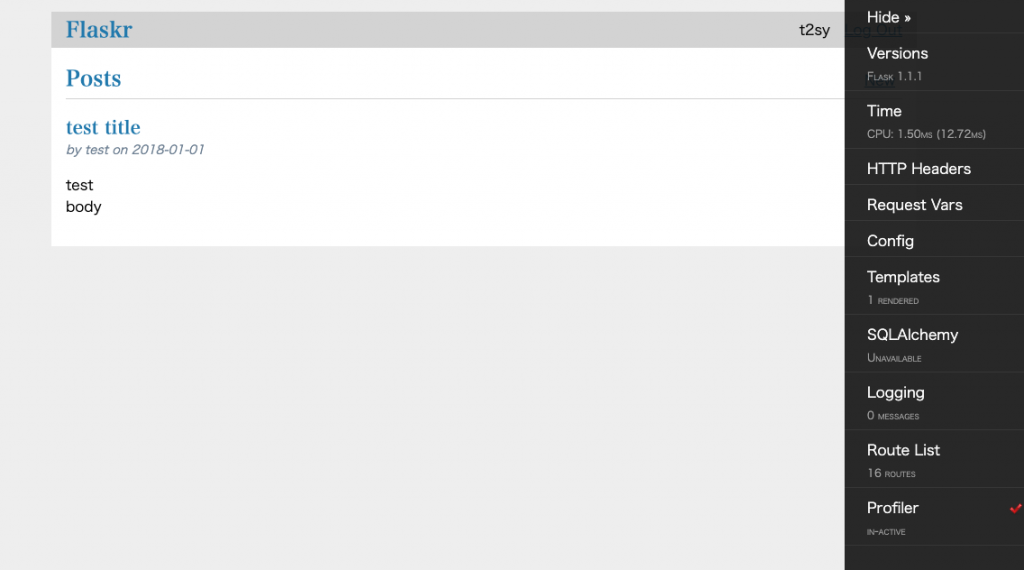
flask run コマンドを実行後, Web ブラウザからアクセスすると以下のように 画面の右側に Toolbar が追加されていることが確認できます。Built-In Panels として Request Vars, Config, Route List などがあります。Profiler は default では disable となっています。

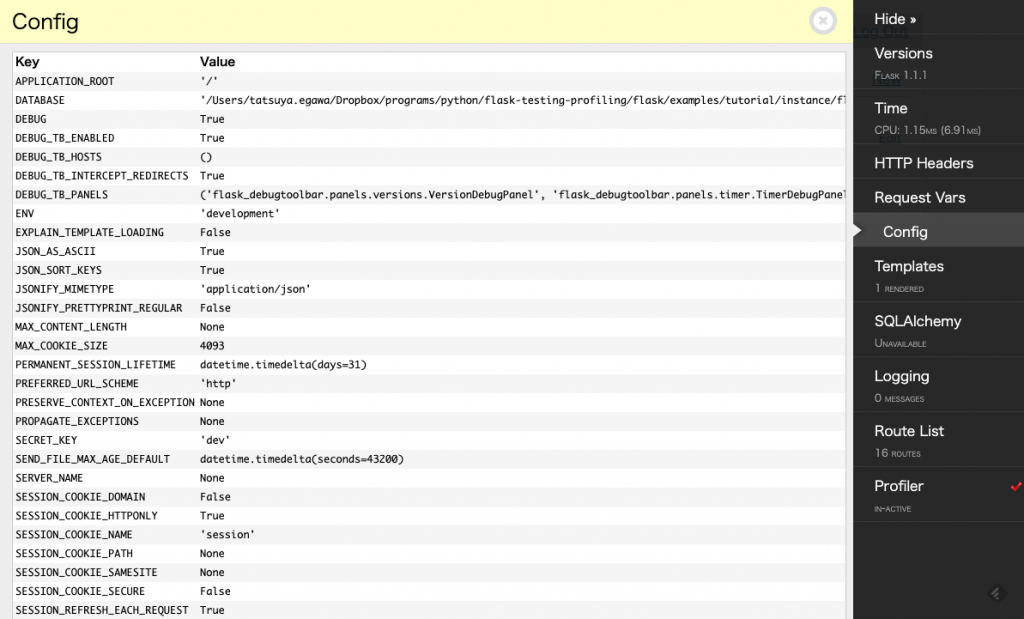
Config panel では以下のように app.config の一覧を確認できます。

おわりに
今回のコードは GitHub (feature/profiling-flaskr branch) に置いています。
[1] module-cProfile[2] Pympler
[3] How to Use Python Profilers: Learn the Basics