今回はメルチメディア系の話です。映像配信で良く使われる RTP/RTSP サーバではなく FFmpeg と Node.js で, MP4配信 / HLS( HTTP Live Streaming )配信 / ffserverを試してみました。
環境は CentOS6.4 (Final)ですが, ビルドは Debian7.4 でも確認しています。
FFmpegインストール
h264S/Wコーデックのx264を使う場合,まずyasm(アセンブラ)をインストールした方がパフォーマンスが上がります。
# you need gcc & make-tools
$ wget https://www.tortall.net/projects/yasm/releases/yasm-1.2.0.tar.gz
$ tar zxvf yasm-1.2.0.tar.gz
$ cd yasm-1.2.0
$ ./configure
$ make
$ make install
続いて, x264のインストールです。
$ git clone git://git.videolan.org/x264
$ ./configure  –disable-opencl --enable-static
$ make
$ make install
AACエンコーダのインストールです。(使わない場合は飛ばします)
$ wget https://downloads.sourceforge.net/faac/faac-1.28.tar.gz
$ tar zxvf faac-1.28.tar.gz
$ cd faac-1.28
$ ./configure --with-mp4v2
$ make
$ make install
debian7.4に入ってるffmpegはver0.8.10なのでソースからインストールします。
ffmpegのソースコードはgitから取得できます。tarball bzip2も手に入ります。
$ git clone git://source.ffmpeg.org/ffmpeg.git ffmpeg
$ https://www.ffmpeg.org/releases/ffmpeg-1.2.6.tar.bz2
$ ./configure --enable-gpl --enable-libx264 --enable-libfaac
$ make
$ sudo make install
アセンブラを使わない場合は–disable-yasmを指定。
コンパイルは30分くらいかかりました…長かった。
HTTP Live Streamingで配信する
まずffmpegでファイルを分割しプレイリストを生成します。
$ ffmpeg -i test.mp4 -acodec copy -vcodec copy -vbsf h264_mp4toannexb -map 0 -f segment -segment_format mpegts -segment_time 2 -segment_list playlist.m3u8 -segment_list_flags -cache stream/stream_%d.ts
ffmpegで生成したplaylistとtsファイルを以下のような構成で配置します。
$ tree
├── ffmpeg_test.js
├── stream
│   ├── playlist.m3u8
│   ├── stream_0.ts
│   ├── stream_1.ts
│   └── stream_2.ts
├── test_playHLS.html
Node.jsで配信する場合、例えばexpressを使っていたら以下のようにpathを設定します。
app.use(express.static(path.join(__dirname,'stream')));
HTML5videoタグのsrcで./playlist.m3u8をしてすれば配信されます。
<!DOCTYPE html>
<html lang="ja">
  <head>
    <meta charset="utf-8">
    <meta name="viewport" content="width=device-width,initial-scale=1,minimum-scale=1,maximum-scale=1,user-scalable=no">
    <title>HTTP Live Streaming Test</title>
  </head>
  <body>
    <header>
      <h1>HTTP Live Streaming Test</h1>
    </header>
    <div>
      <video width="640" height="480" src="./playlist.m3u8" preload="none" onclick="this.play()" controls />
    </div>
  </body>
</html>
ただし,application/vnd.apple.mpegurlかapplication/x-mpegURのMIMEをサポートしているブラウザでないと再生されません。
Appleのプロトコルなので iOS / Safariでは再生できます。
USBCamの映像をffserverで配信する
USBCamからリアルタイム配信する場合, inputをUSBCamにしてUVCを扱うためV4L2を使います。
今回はBeagleBoneBlack(以下BBB)に繋いだUSBCamから映像を取得しffserverで配信し, 同一セグメント上のPCで映像を確認します。
まずffserverの設定ファイルを配置します。
# /etc/ffserver.conf

# Port on which the server is listening. You must select a different
# port from your standard HTTP web server if it is running on the same
# computer.
Port 8090

# Address on which the server is bound. Only useful if you have
# several network interfaces.
BindAddress 0.0.0.0

# Number of simultaneous HTTP connections that can be handled. It has
# to be defined *before* the MaxClients parameter, since it defines the
# MaxClients maximum limit.
MaxHTTPConnections 2000

# Number of simultaneous requests that can be handled. Since FFServer
# is very fast, it is more likely that you will want to leave this high
# and use MaxBandwidth, below.
MaxClients 1000

# This the maximum amount of kbit/sec that you are prepared to
# consume when streaming to clients.
MaxBandwidth 4096

# Access log file (uses standard Apache log file format)
# '-' is the standard output.
CustomLog -

##################################################################


File /tmp/feed1.ffm
FileMaxSize 100M
# Only allow connections from localhost to the feed.
ACL allow 127.0.0.1


##################################################################

# coming from live feed 'feed1'
Feed feed1.ffm

# Bitrate for the video stream
VideoBitRate 256

# Ratecontrol buffer size
#VideoBufferSize 40

# Number of frames per second
#VideoFrameRate 3
VideoSize 320x240

# Suppress audio
NoAudio


##################################################################
# Example streams
# Flash


Feed feed1.ffm
Format swf
VideoFrameRate 5
VideoSize 320x240
NoAudio
VideoBitRate 1024


##################################################################
# Special streams
# Server status


Format status
# Only allow local people to get the status
ACL allow localhost
ACL allow 192.168.0.0 192.168.255.255
#FaviconURL https://pond1.gladstonefamily.net:8080/favicon.ico

# Redirect index.html to the appropriate site


URL https://www.ffmpeg.org/
ffserverを起動します。
$ ffserver -d -f /etc/ffserver.conf &
$ ffmpeg -s 320x240  -f video4linux2 -i /dev/video0  https://127.0.0.1:8090/feed1.ffm
ffmpegのオプションで/etc/ffserver.confと矛盾する設定をするとfeedが上手く処理されず配信されないので注意してください。
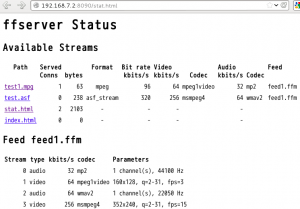
stat.htmlにアクセスするとサーバ状態が確認でき,test.swfでvideoが見れます。
Node.jsからffmpegを叩く
続いて, h264ファイルをリアルタイムでMP4コンテナフォーマットに変換して配信してみます。
また, スマホ等で取得した映像もサーバで受け取ってから工夫すれば変換できると思います。
Node.jsでリクエスト時にリアルタイム変換したい場合。
child_process.spawnで子プロセスを起動して,ffmpegを叩きその出力をSTDOUTにしpipeでresponseに流します。
app.get('/conversion_test.mp4', function(request, response) {

 setTimeout(function(){
  // Write header
  response.writeHead(200, {  'Content-Type': 'application/mp4' });

  // video size
  width = 640;
  height = 480;

  var ffmpeg = child_process.spawn("ffmpeg",[
                "-i","./stream/in.264", // if you need STDIN , set "pipe:0"
                "-re",               // Real time mode
                "-f","mp4",          // mp4
                "-s",width+"x"+height,   // VGA
                "-r","3",              // Framerate
                "-vcodec","libx264",     // 264 Enc
                "-acodec","libfaac",      //  AAC Enc
                "-vb","256k",
                "-ab","64k",
                "pipe:1" // Output -> STDOUT
  ]);
   // Pipe the video output to the client response
   ffmpeg.stdout.pipe(response);
   // Kill the subprocesses when client disconnects
   response.on("close",function(){
     ffmpeg.kill();
   })
  },1000);
});
これだとエラーでした。
[mp4 @ 0x2b8f520] muxer does not support non seekable output
標準出力だとseekできないようなので、オプション -f mpegts に変えたらOKできました。
スマホ連携あたりも面白そうですね。
FFmpeg参考
* この記事はkarotaの活動に関する記事です。

